This chapter contains the following topics:
Producing Checks and Direct Deposit
Direct Deposit and Payroll Processing
Use the Checks selection to print payroll checks and direct deposit mailers after you run Calculate payroll. After the checks and mailers are printed, the Payroll Registers print.
The payroll check information is then posted to Payroll Distributions, Employees, Time Worked History, Payroll History, QTD History, YTD History, and YTD state and city History.
You can enter time transactions and print checks and post them up to the end of the 1st quarter in the new year.
For example, assuming the year just ended is 2014 and the new year is 2015. In this case, Control information specifies that the current payroll year is 2014. Transactions dated in 2014 can be entered and posted. Transactions dated in the first quarter of 2015 can also be entered and posted. Transactions dated before 2014 or after the first quarter of 2015, (i.e. after March 31st), cannot be entered and posted.
When Close a year is run using this example, the quarterly data for 2014 and the year-to-date data for 2014 are purged, and any data already posted for the first quarter of 2015 is made available for reporting. The current payroll year in the Control information is updated to 15 from 14.
Select
Checks from the PR menu.
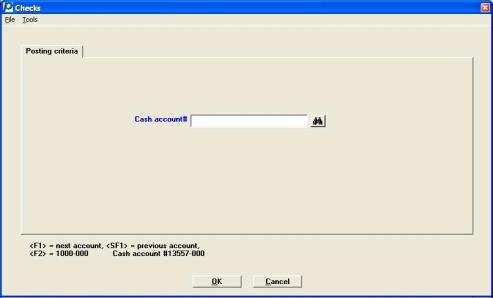
If you are using multiple cash accounts the following screen displays:
If you are using only one cash account, the first screen is skipped and the cash account in Control information is used automatically.
This screen determines the cash account used for printing checks. The account used for direct deposit is entered in PR Control information.
Options
Enter the cash account to use to pay the employees you select later. The account must already be in existence in CTL Cash accounts. You can use one of the options:
|
<F1> |
For the next entry in Cash accounts. The <F1> and <SF1> options are not available if only one entry has been defined in Cash accounts. |
|
<SF1> |
For previous cash account |
|
<F2> |
For the default cash account in Control information |
After you select the Enter key for the selected cash account, the check date format will display beneath the cash account name. The check date format is set up in Cash accounts under Ctl. The PBS System manual has more information on this set up.
Checks and ACH direct deposit mailer forms will print according to the format selected in PR Control information. There are several form types for checks and direct deposit. See the PR Control Information chapter for more information on the forms choices for each.
Checks will print first if any were calculated. The direct deposit mailers and ACH direct deposit file generation will run next.
Please mount check forms on printer
Mount the check forms on the printer with the perforation even with the top of the print head. (If you are using a laser printer, load the check forms in the printer’s paper tray according to the instructions in the printer’s user manual.)
If you use checks preprinted with check numbers, note the first serial number of the checks you have mounted. You use this to ensure the first and last check #’s are entered correctly.
The serial number is the number preprinted on the check, in contrast to the check number recorded in the software.
After mounting the check forms, you are asked to select a printer.
Company information laser alignment
Print alignment form?
If printing checks with a laser printer, you are first asked to enter Up/down adjustment and Left/right adjustment amounts to adjust the alignment of the laser printer. The values last entered for these amounts are shown. After entering new values or accepting the values shown, you are then asked Print alignment form?.
After the alignment is printed, you are asked Print alignment form?. (If printing checks with a laser printer, you are given the chance to adjust the alignment before printing another alignment form.)
With the graphical form you may print an alignment, however there is no way to adjust the alignment.
Enter number of copies to print
If you are printing checks with a laser printer, you are asked to enter the number of copies and the labels for each copy. (Leave the Label for 1st part field blank if you do not want to print a label on the original copy of the check.) If you print more than one copy, the second and subsequent copies have * VOID - NOT NEGOTIABLE * printed in the signature area of the check.
Using the graphical form you may only print one page per check.
When you are finished printing alignment forms, note the serial number of the first check which is actually printed.
In graphical mode the following tab displays:
To avoid possible duplicate check numbers, the screen above and other check printing screens cannot be defaulted using MySet.
Character Mode
In character mode the following screen displays:
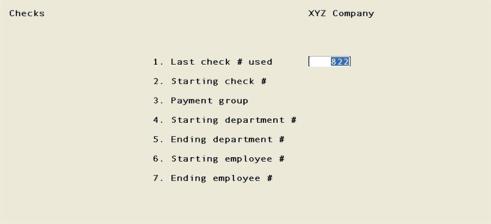
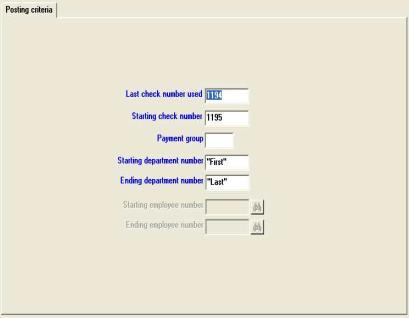
Enter the following fields:
Enter this field in order to account for any check forms which have been used for manual checks since the last time computer checks were cut.
The check number displayed on the screen for last check # used is obtained from Cash Accounts. Cash Accounts was updated with the highest check number used the last time you printed computer checks.
If this check number is one less than the serial number on the first check form originally mounted on the printer, press <Enter>. Otherwise, enter a number which is one less than the serial number of the first check form you placed in the printer (prior to printing any test alignments).
If you enter a check number instead of using the displayed number, checks numbered from one greater than the check number originally displayed, up to the check number you enter here, are logged on the check register as Not accounted for on this register.
For example, assume that the number originally displayed is 157. The first serial number on the checks you mount on the printer is 162. You then print two alignment forms. You would enter 161 for last check # used as this number is one less than the serial number of the first check form you placed in the printer prior to printing any test alignments. The check register would then show that checks 158-161 are unaccounted for on this register. (Checks numbered 162 and 163 will be marked as void when the procedure for Starting check # is followed, as described below.)
|
Format |
999999 The default is the check number recorded as the last one used for that cash account. |
|
Example |
Press <Enter> |
This field is entered to ensure that the check number printed by the computer on the check form corresponds to the serial number on the check form.
If the number displayed here corresponds to the serial number of the check form which is currently mounted on the printer, press <Enter>. Otherwise, enter the serial number of the check form which is currently mounted on the printer.
If the starting check # is not one greater than the last check # used, the computer logs all checks between these numbers as void on the check register. These correspond exactly to the check forms used for test alignment.
Continuing the example from above, if you enter 161 for the last check # used, the computer displays 162 as the starting check number. However, since 2 test alignments were printed, the serial number of the check form which is next to print is 164 (because the starting serial number was 162 and forms 162 and 163 were used for test alignments.) Thus, you would enter 164 for the starting check #. The computer logs checks 162 and 163 as void on the register.
|
Format |
999999 |
|
Example |
Press <Enter> |
When you enter employee information, you can specify a 3-character code for the payment group that the employee belongs.
Subsequently, when printing checks, you can selectively print checks by payment group by entering the appropriate 3-character code for the payment group here.
Options
If you want to pay only employees in a specific payment group, enter the payment group. Otherwise, use one of the options:
|
<Enter> |
To print checks for only those employees who do not have a payment group |
|
<F5> |
For "All" payment groups |
|
Format |
Three characters |
|
Example |
Press <F5> |
and
Options
Enter the range of departments for which you wish to print checks, or use the option:
|
<F2> |
For the First (in Field #4) or Last (in Field #5) department for which checks are to be printed |
|
<Enter> |
For only one department |
|
Format |
9999 at each field |
|
Example |
Select <Enter> for the defaults at each field |
and
If a range of departments, or All departments, has been specified then these fields are grayed out and not enterable in graphical and they display as (Not applicable) in character mode and these fields are skipped. It is assumed that if you ask for more than one department you want checks for all eligible employees of those departments.
Options
Otherwise, enter the range of employee numbers to be included, or use the option:
|
<F2> |
For the First (in Field #6) or Last (in Field #7) employee for which checks are to be printed |
|
Format |
999999 at each field |
Field number to change ?
This field only displays in character mode. Make any needed changes and then press <Enter>.
Verifications and Check Printing
A date message displays, and you are asked if the date is correct. Select <Enter> for Yes. If you select No, you must recalculate payroll to change the date.
If the check # range is incorrect (those that did not show on register) a message displays asking the user to OK this gap in the check run.
The graphical form type may only be used with Windows printer. Selecting a Company information printer is not allowed. You may print an alignment, however there is no adjustment of the alignment available with graphical checks.
If you are licensed for the Affordable Care Act software, the Offer of coverage notice from Control information, will print on the employee's graphical check stub Deductions box if the employee has an Employee ACA record for the current year and the Insurance offered field is checked.
Follow the guidelines below when printing checks on a laser printer with a form designed for use with a Company information laser printer:
| • | When using a laser printer, you can save check form stock by printing the alignment on plain paper. |
After printing the alignment on plain paper, place the plain paper on top of one of the pre-printed check forms and mailers and hold them up to a bright light to verify the alignment.
Make any adjustments necessary and continue printing alignments on plain paper until you have the correct alignment.
| • | Load the pre-printed check forms and mailers in the paper tray before answering N to Print alignment ?. |
| • | Use the up/down and left/right adjustments for laser alignment to position the check and mailer information so that it exactly aligns with the pre-printed form. |
The pre-printed PBS check and mailers forms are produced according to very exact specifications, but the print position of laser printers may vary slightly from model to model or between manufacturers. These adjustment amounts allow you to compensate for the differences between laser printers so that your form information can be positioned correctly on the form.
| • | Windows only printers, such as LaserJets, InkJets and most multi-purpose printers/scanners/fax machines, do not support an adjustment feature. The adjustment amounts are ignored or respond poorly with these printers. |
|
Note |
You may use the graphical form type with Windows printer. Windows printer will not work for the other printing check types. A Company information laser printer is recommended for printing other check types. The printer must be PCL5 compatible. Do not use Windows printer to print to a dot matrix printer. |
There will be a period of processing as checks are printed.
The payroll checks are printed in order by employee number within each department and by department number. After the checks are printed, you are asked if they are correct. This is a precaution in case printer failure destroys some checks.
If you respond that the checks are not correct, you are asked whether to void all checks or void selected checks.
When using the graphical form for hourly employees it always prints the overtime and special rates. For the other form types the overtime and a special rates may print on the stub. For the setting see the Print overtime/special rates on stub field in the Control information chapter.
Traditional and Roth 401(k) amounts deducted from the check are printed on the stub. If both traditional Roth are used by the same employee, depending on the type of form, the following occurs:
| • | For a graphical check form it prints the amounts for both types |
| • | For all other check forms it combines the types |
If you choose to void any checks, you prevent any distributions for those checks. Follow the screen instructions.
If checks are reprinted, each check printed previously with the same department, employee number, check date, and check number is considered void by the package.
When the checks have been printed, you may be ready to post the transactions. For a description of the posting registers see Post Checks and ACH Transactions. If you are also printing direct deposit mailers for the pay run go to the next section. Registers will print after that.
If you are using electronic payment direct deposit, the program will ask if you want to print the direct mailers. Select <Esc> to print the mailers.
Please mount mailer forms on printer
Mount the mailer forms on the printer with the perforation even with the top of the print head. (If you are using a laser printer, load the check forms in the printer’s paper tray according to the instructions in the printer’s user manual.)
After mounting the mailer forms, you are asked to select a printer.
Print alignment form ?
If printing checks with a laser printer, you are first asked to enter Up/down adjustment and Left/right adjustment amounts to adjust the alignment of the laser printer. The values last entered for these amounts are shown. After entering new values or accepting the values shown, you are then asked Print alignment ?.
After the alignment is printed, you are asked Print alignment ?. (If printing mailers with a laser printer, you are given the chance to adjust the alignment before printing another alignment form.)
Using the graphical mailer form you may print an alignment. However, there is no way to adjust the printing.
Enter number of copies to print
If you are printing mailers with a laser printer, you are asked to enter the number of copies and the labels for each copy. If you print more than one copy, the second and subsequent copies have * VOID - NOT NEGOTIABLE * printed in the signature area of the check.
Using a graphical mailer you may only print one page per direct deposit payment.
Enter the following direct deposit fields:
In character mode enter the following fields:
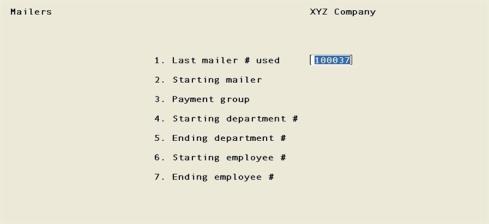
Enter the following information:
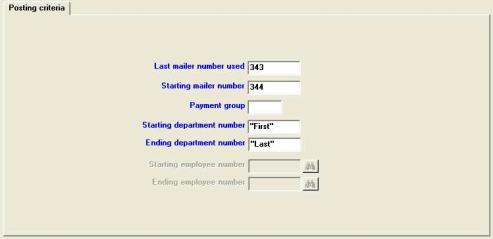
The Direct Deposit mailer number displayed is obtained from the Last PR ACH # field in Cash accounts. The Cash Accounts field was updated with the highest number used the last time you generated direct deposit ACH payments.
If you enter a transaction number instead of using the displayed number, ACH direct deposit transactions numbered from one greater than the number originally displayed, up to the transaction number you enter here, are logged on the ACH direct deposit register as Not accounted for on this register.
|
Format |
999999 The default is the transaction number recorded as the last one used for that cash account. |
|
Example |
Press <Enter> |
If the number displayed here corresponds to the next Direct Deposit ACH number in Cash Accounts. Press <Enter> to accept the default. Otherwise, enter the next mailer number.
If the starting mailer number is not one greater than the Last ACH # used, the computer logs all direct deposit numbers between these as void on the direct deposit register.
|
Format |
999999 |
|
Example |
Press <Enter> |
When you enter employee information, you can specify a 3-character code for the payment group that the employee belongs.
Subsequently, when generating ACH direct deposit, you can selectively make payments for a payment group by entering the appropriate 3-character code for the payment group here.
Options
If you want to pay only employees in a specific payment group, enter the payment group. Otherwise, use one of the options:
|
<Enter> |
To print mailers for only those employees who do not have a payment group |
|
<F5> |
For All payment groups |
|
Format |
Three characters |
|
Example |
Press <F5> |
Starting department number and
Options
Enter the range of departments for which you wish to generate ACH direct deposit mailers, or use the option:
|
<F2> |
For the First or Last department for which mailers are to be printed |
|
<Enter> |
If you want only one department, press this in Ending department number field |
|
Format |
9999 at each field |
|
Example |
Press <F2> at each field |
If a range of departments, or All departments, has been specified then (Not applicable) displays here and these fields are skipped. It is assumed that if you ask for more than one department you want checks for all eligible employees of those departments.
Options
Otherwise, enter the range of employee numbers to be included, or use the option:
|
<F2> |
For the First or Last employee for which Direct Deposit ACH payments and mailers are to be printed |
|
Format |
999999 at each field |
If the transaction mailer # range is incorrect (those that did not show on register) a message displays asking the user to OK this transaction number gap in the mailer run.
Include company name on mailer
This field determines if you want to print your company name on the mailer. If you check this box the company prints on the "check" part of the mailer.
|
Format |
Graphical: Check box. The default is unchecked Character: Enter Y or N |
|
Example |
Select None |
The graphical form type may only be used with Windows printer. Selecting a Company information printer is not allowed. You may print an alignment, however there is no adjustment of the alignment available with graphical mailers.
If you are licensed for the Affordable Care Act software, the Offer of coverage notice from Control information, will print on the employee's graphical mailer stub Deductions box if the employee has an Employee ACA record for the current year and the Insurance offered field is checked.
You may print mailers on plain paper. If you do then this does not apply to you.
Follow the guidelines below when printing checks or mailers on a laser printer with a form designed for use with a Company information printer:
| • | When using a laser printer, you can save mailer form stock (if you have any) by printing the alignment on plain paper. |
After printing the alignment on plain paper, place the plain paper on top of one of the pre-printed check forms and mailers and hold them up to a bright light to verify the alignment.
Make any adjustments necessary and continue printing alignments on plain paper until you have the correct alignment.
| • | Load the pre-printed mailers in the paper tray before answering N to Print alignment ?. |
| • | Use the up/down and left/right adjustments for laser alignment to position the check and mailer information so that it exactly aligns with the pre-printed form. |
The pre-printed PBS check and mailers forms are produced according to very exact specifications, but the print position of laser printers may vary slightly from model to model or between manufacturers. These adjustment amounts allow you to compensate for the differences between laser printers so that your form information can be positioned correctly on the form.
| • | Windows only printers, such as LaserJets, InkJets and most multi-purpose printers/scanners/fax machines, do not support an adjustment feature. The adjustment amounts are ignored or respond poorly with these printers. |
|
Note |
You may use the graphical form type with Windows printer. Windows printer will not work for the other printing check or mailer types. A Company information laser printer is recommended for printing other check types. The printer must be PCL5 compatible. Do not use Windows printer to print to a dot matrix printer. |
There will be a period of processing as mailers are printed.
The payroll mailers are printed in order by employee number within each department and by department number. After the mailers are printed, you are asked if they are correct. This is a precaution in case printer failure destroys some mailers.
Overtime and special rates always print on a graphical mailer. For other mailer types and for hourly employees, the overtime and a special rates may print on the mailer. See the Print overtime/special rates on stub field in the Control information chapter.
Traditional and Roth 401(k) amounts deducted from the check are printed on the stub. If both traditional Roth are used by the same employee, depending on the type of form, the following occurs:
| • | For a graphical mailer it prints the amounts for both types |
| • | For all other mailers it combines the types |
If you respond that the mailers are not correct, you are asked whether to void all mailers or void selected mailers. When you select to void one or more mailers, these payments will not be written to the ACH file.
If you choose to void any mailers, you prevent any distributions for those mailers. Follow the screen instructions.
If mailers are reprinted, each mailer printed previously with the same department, employee number, mailer date, and mailer number is considered void by the package.
The ACH file is generated when the Payroll Direct Deposit Register prints.
Press Cancel or <Esc> = print check register and post distributions
When the mailers have been printed, you are ready to post the transactions. For a description of the register see Post Checks and Direct Deposit ACH Transactions.
Please mount regular paper on printer
Check the box or type DONE in character mode after you have mounted the regular paper.
During calculate payroll and check and ACH posting you will be prompted to print registers. The following is a description of each register and when it may be printed:
|
Register Name |
When |
Description |
|
Time Worked Register |
Calculate |
This provides the employee details regarding salaries, vacation hours, sick hours, temporary deductions and wage account |
|
Payroll Register |
Calculate |
Provides the deductions and earnings totals by department |
|
Deductions Register |
Calculate |
Provides the union fees, loans, garnishments, and permanent deductions/earnings by employee |
|
Payroll Check Register |
Posting |
Provides the check and direct deposit amounts by employee |
|
Payroll Direct Deposit Register |
Posting |
Provides the direct deposit amounts by employee. Also provides the location of the direct deposit ACH file |
The Payroll Direct Deposit Register will only print if you are using the Payroll ACH Direct Deposit features.
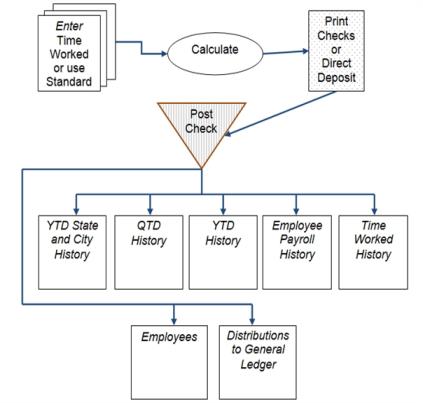
The payroll payment information is then posted to Payroll Distributions, Time Worked History, Employees, Payroll History, QTD History, YTD History, and YTD State and City History. The following graph represents the files involved with a Payroll payment run from the entry of Time worked or use of Standard payroll to the posting.
Job Cost Interface When Posting
If Payroll is interfaced to the Job Cost package, distribution information is also posted to Job Details.
Interface to Check Reconciliation
The cash account used when printing checks or generating an ACH file must be setup as a checking account in C/R in order to interface to C/R.
Per the Check Reconciliation Control information you may be setup to automatically post to the C/R Check Book (CKBOOK). When you are automatically posting to Check Reconciliation, the Check Register will include this message:
Checks automatically transferred to Check Reconciliation
The Direct Deposit Register will indicate this:
Direct deposits automatically transferred to Check Reconciliation
If you are not setup to automatically post, you must run the Transfer checks\deposits function on the C/R menu to pull the data into Check Reconciliation.
Time Transactions after Posting
After the payroll information is posted, Time Transactions are cleared of entries for all checks and direct deposit transactions that were correct. If some checks or transactions were not correct (and thus voided) but not reprinted, the entries remain on file.
Multi-city and Multi-state
If you use multi-city and multi-state capability, an employee will receive one check with the total amounts.
Direct deposit is an option that is set up in Payroll Control Information. Your choices are, to not use it, to produce a Report only direct deposit or to use the Electronic payment method.
The direct deposit Report only method produces a form that shows the amounts that need to be directly deposited.
The Electronic payment direct deposit method produces a mailer form per employee and an electronic payment ACH file used for for submitting to the bank. See Implement Positive Pay and Direct Deposit for more information on setting up the Electonric payment method.
|
Note |
If you are using PBS Check Reconciliation checks are transfered to C/R wtih a check number and the ACH direct deposit amounts are transferred with a transaction number. The last check number used and the last transaction number used are set up in CTL Cash accounts. |
The Report only method uses one of two financial institutions. In Employees you can specify an account number for each employee who has a direct deposit amount deducted from his/her paycheck.
When Payroll posts a check for which all or part of the check is directly deposited, the portion that is directly deposited is posted as a credit to the General Ledger account specified for this purpose in Control Information, rather than as a credit to the cash account selected when printing checks.
When check amounts are directly deposited, a register prints showing a summary of the deposit amounts by employee account number with the financial institution.
After check printing and posting is completed, write a check for the total amount of the direct deposit to the financial institution. Send a copy of the register, as well as the check, to the financial institution, so that your employees’ accounts can be correctly credited.
The table below describes what to do with or without Accounts Payable and General Ledger. Find the row and column that corresponds to the packages you have, and follow those instructions.
|
|
Direct deposits (report only) |
|
|
|
No G/L |
G/L |
|
No A/P |
Pay the direct deposit amount to the financial institution using a manual check. Do not record this check in your payroll system. Instead, record the check amount in your manual or other General Ledger system as a debit to the direct deposit account and a credit to the cash account from which the check was drawn. |
Do the same as at left, but post the check into your PBS General Ledger by entering General Journal transactions. |
|
A/P |
Pay the direct deposit amount with a manual check and enter a Non-A/P check type voucher in your PBS Accounts Payable system for the amount of the check. For this voucher, enter the cash account from which the check was drawn and distribute the full amount to the direct deposit account. |
Do the same as at left. |
The Electronic payment method of direct deposit allows you to offer direct deposit processing for your employees. It makes it easier for you because an ACH file is generated which you submit to your bank who directly deposits pay to your employees.
One processing bank is designated with the cash account, with the number of receiving (employee) banks being unlimited. The employees participating in direct deposit can choose up to fifteen bank accounts to multiple banks to deposit their pay. Once Payroll is setup for direct deposit, an ACH-formatted file for automated clearing is generated during a Payroll pay run to interface with the processing bank.
The steps to setup your system for Electronic payment direct deposit is documented in the Implement Positive Pay and Direct Deposit appendix.
Electronic payment Direct Deposit Accounting
When Payroll posts a check for which all or part of the check is directly deposited, the portion that is directly deposited is posted as a credit to the General Ledger account specified for this purpose in Payroll Control information, rather than as a credit to the cash account selected when printing checks.
When the pay amounts are written to the direct deposit ACH file a register prints showing a summary of the deposit amounts for each employee by bank account.
The table below describes what to do with or without General Ledger (G/L) and Accounts Payable (A/P). Find the row and column that corresponds to what you have, and follow those instructions.
|
|
Direct deposits (electronic payment) |
|
|
|
No G/L |
G/L |
|
No A/P |
Distributions are stored in Payroll distributions. |
There is nothing to do in G/L because the amounts are properly pulled into G/L when Get distributions for Payroll is run. |
|
A/P |
There is nothing to do in A/P because the amounts are properly pulled into G/L when Get distributions for Payroll is run. |
Do the same as at left. |